How to Set Logon Hours for Multiple Remote Users
Tested and trusted steps to set Logon hours
- Users with limited logon hours cannot access their accounts once their hours have expired.
- You need administrative privileges to create new users in the Active Directory.
- You can set logon hours for a group of users or a specific user.
Logon hours is a Windows Active Directory feature that allows administrators to restrict network access at specific times. When Logon hours are set, all remote users will be able to access the network for the preset time frame.
In this article, we’ll briefly discuss what Logon hours are, and we’ll provide you with detailed steps to help you set them for multiple remote users.
What are Logon hours?
As the name implies, Logon hours are time frames when a user is permitted to Logon to a particular service or network.
For Windows users, Logon hours is a feature in Active Directory that stipulates the dates and times on which users can access a network.
Further, Logon hours are usually applied in the network infrastructure of big companies and corporations to enhance security by ensuring that employees can access the company’s network at the stipulated time.
How can I set Logon hours for multiple Remote Users?
1. Set for multiple users
- Press the Windows key + S, type in Server Manager, and hit Enter.
- In the Server Manager window, click on Tools on the right pane, and select Active Directory Users and Computers.
- In the next window, right-click on 4sysops.local, click on New, and select Create an organizational unit.
- Then, press Ctrl + A to highlight all the users in the Organizational Unit, right-click the highlighted users, and select Properties.
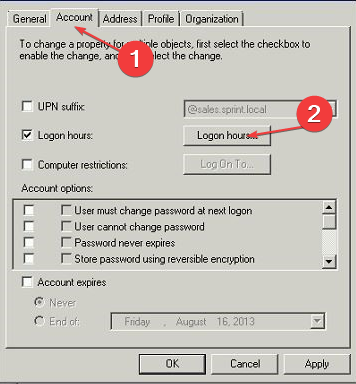
- On the Properties window, navigate to the Account tab.

- Click on the checkbox next to Logon hours, and click the Logon hours button to open the page. (By default, the Logon hours of most users are permitted at all times. However, you’ll need to change the hours according to your preference.)
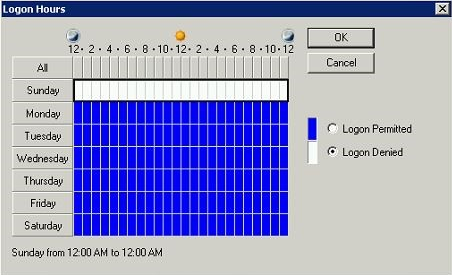
- On the Logon hours page, click on Logon Denied to remove the default logon hours.
The Logon Hours page is sectioned into two; morning to afternoon (9 am to 12 pm) and afternoon to midnight (2 pm to 12 am).
- To set your preferred Logon hours, hover over the mini-boxes, click on your preferred Day & Time, and drag the cursor across or downwards depending on the specific time you want to set.

- Once you’re done setting the Logon hours, Click on OK.
- In the next window, click Apply, and click on OK.
Aside from restricting Logon hours for a group of users, you can also choose to set it for a specific user. This rule will only apply to the singular user and won’t affect the logon hours of other users.
2. Set for Single user
- Follow steps 1 and 2 above to open the Active Directory Users window.
- Then, click on Users to display the list of users on the network.
- Alternatively, you can create a new user by: Right-click the Users button and select New.
- On the Users page, scroll to locate the user you wish to set logon hours, right-click the option, and select Properties.
- Then, navigate to the Account tab, and click the Logon hours button.
- Follow steps 8 to 11 to set the logon hours for the specific user.
In some cases, users have reported that they’re unable to locate Active Directory Users and Computers on their PCs.
This error prevents them from accessing the service and its functionalities. Here is a detailed guide showing you how to enable active directory on windows.
Restricting Logon Hours for users in an organization is advisable if you have official confirmation from the management.
However, if you’re testing the feature on your local machines, you can apply the steps listed above to help you restrict logon hours for users.
Still having issues? Fix them with this tool:
SPONSORED
If the advices above haven't solved your issue, your PC may experience deeper Windows problems. We recommend downloading this PC Repair tool (rated Great on TrustPilot.com) to easily address them. After installation, simply click the Start Scan button and then press on Repair All.