Fix: The Installer Failed to Properly Install This Driver Error
Disable Device Installation Restrictions in Group Policy Editor
- The error can occur due to corrupt driver files or security software restriction settings in the Group Policy.
- You can fix it by running the SetupChipset.exe - overall command and manually installing the driver.
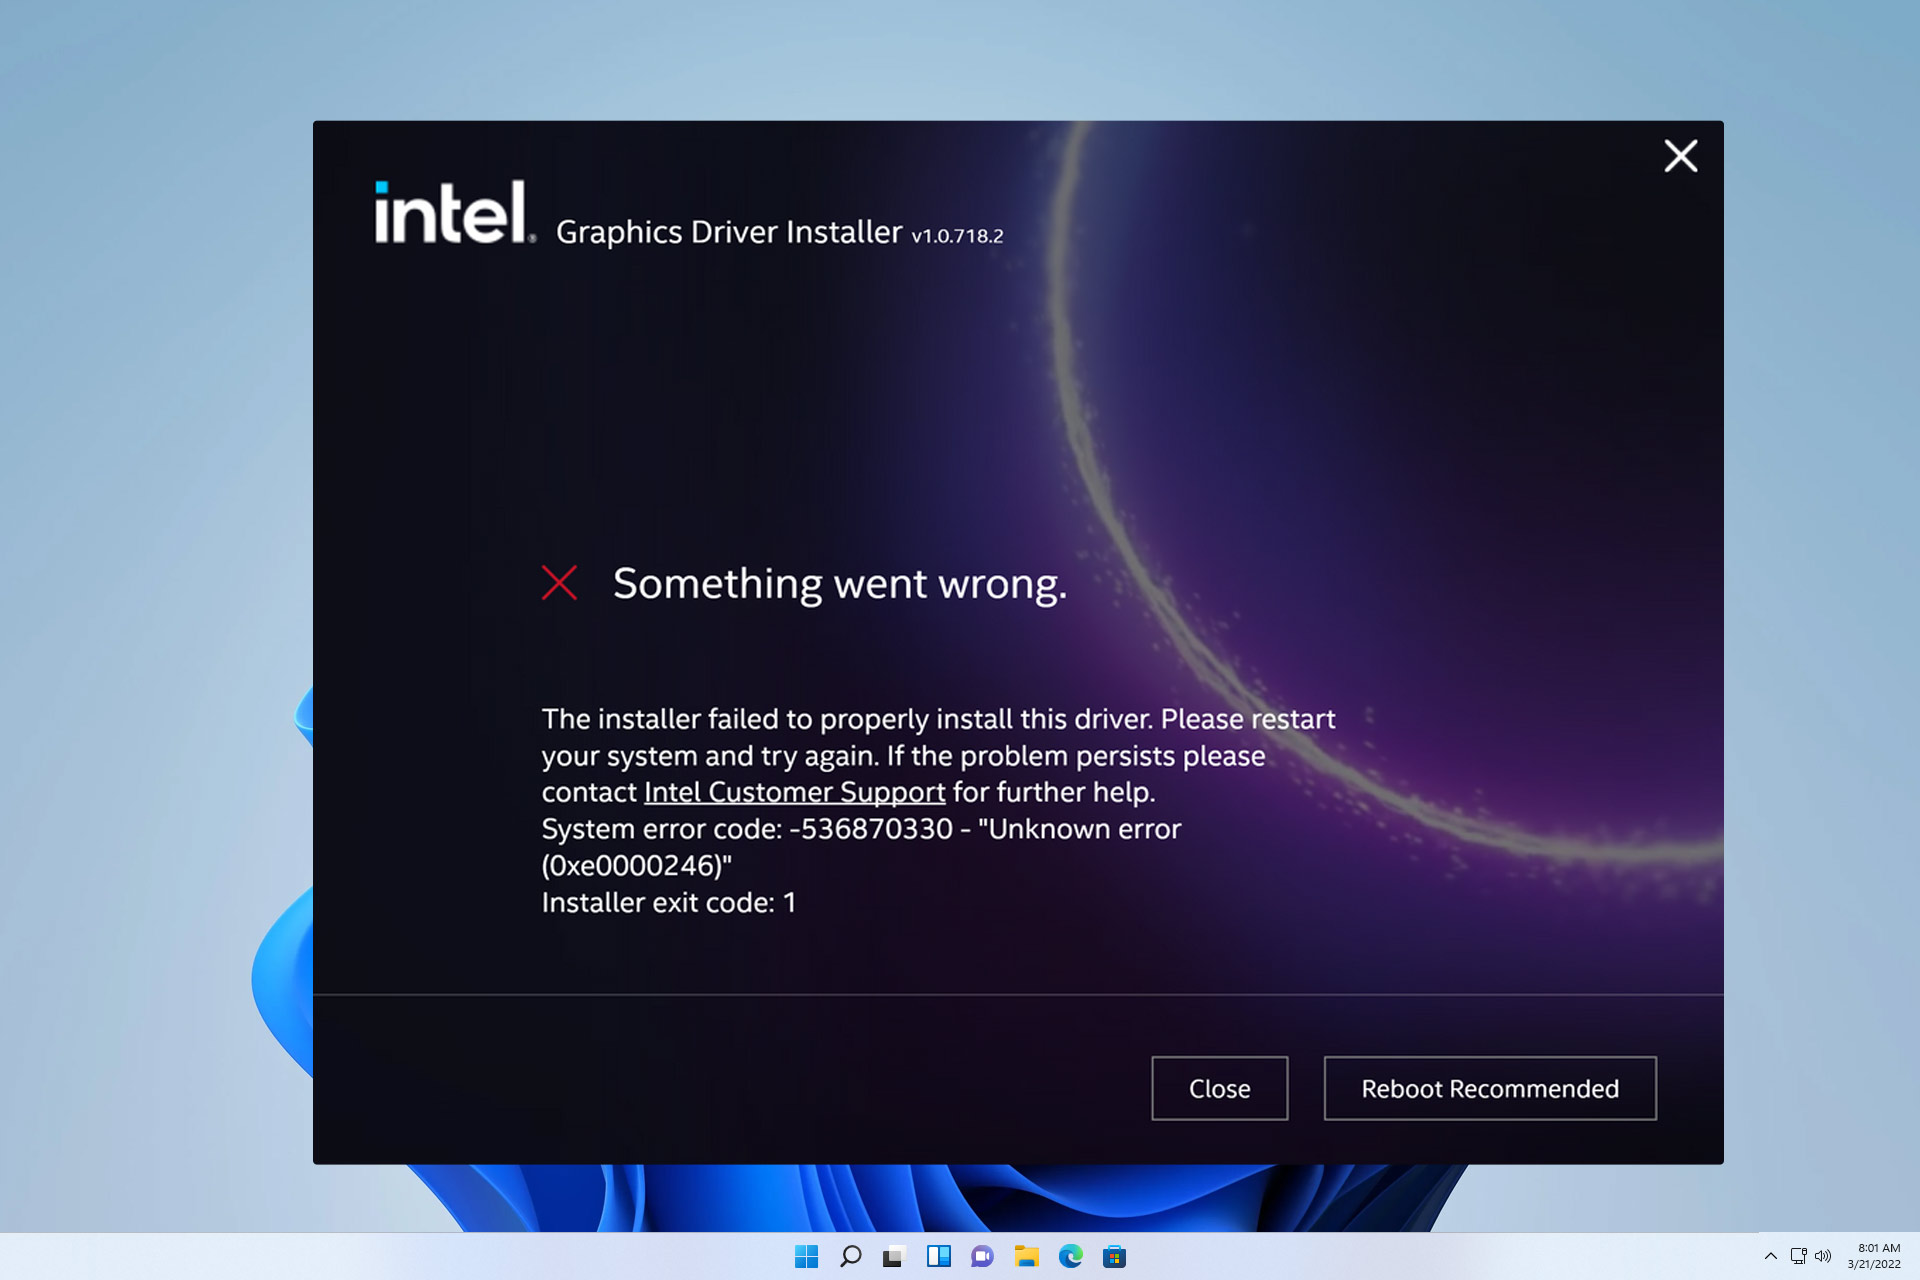
Some of our readers have reported running into an error the Installer failed to install this driver when they tried to install their drivers. The error can be annoying but can be fixed by following basic steps.
Hence, this guide will discuss ways to resolve the problem. Also, you may be interested in our guide about what to do if the no signed device drivers found error appears on your PC.
Why did the installer fail to install this driver properly?
Various factors may be responsible for the error on your computer. Some notable ones are listed below:
- Corrupt driver file – The installer failed to properly install this driver error can occur when the downloaded driver file is corrupt, making it impossible for the installer to access and install the driver.
- Driver incompatibility – Reinstalling a driver or downloading a new version on your computer may be unsuccessful because the driver is incompatible with your OS. So, it causes the installation process to result in errors.
- Security software restrictions – Having security software or programs running firewall services can impede the driver installation on your computer. It occurs when they flag the process as a threat to the system, resulting in this error.
- Device Installation Restrictions configuration – When the Device Installation Restrictions option is running in the Computer configuration, it can prevent the installation of devices not described by other policy settings, causing the error.
Regardless, we’ll take you through the steps to fix the issue and install your driver.
How can I fix the installer failed to properly install this driver error?
Before attempting any advanced troubleshooting steps, apply the following:
- Perform a Clean boot – It will start the system with only the most essential files and services required by the operating system, preventing third-party programs from interfering with your driver installation.
- Turn off background apps – Ending tasks for background processes and apps running on your computer will stop programs from intercepting or blocking the driver installer.
- Update/backdate Windows OS – Installing the latest operating system updates will fix compatibility problems liable to cause the error. Also, you can roll back the Windows update if you installed an update before the error.
Proceed with the fixes below if the error occurs after following the steps above:
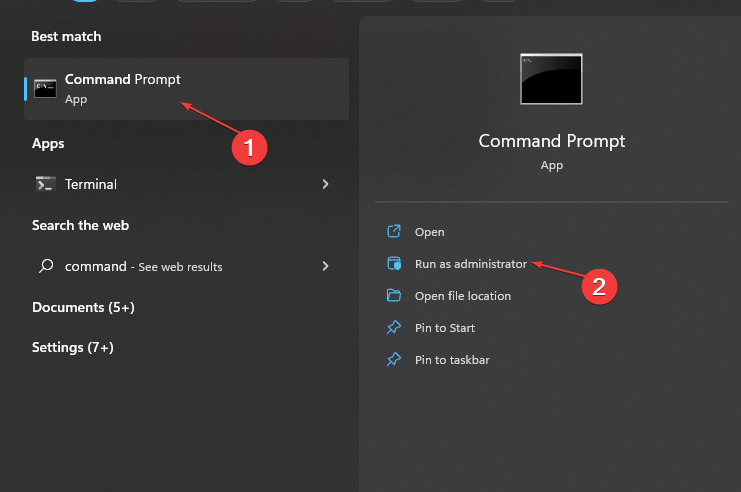
1. Run the chipset with a command line switch
- Left-click the Start button, type Command Prompt, and click the Run as administrator option.

- Click Yes on the User Account Control (UAC) prompt.
- Copy and paste the following in the command bar, then press Enter:
SetupChipset.exe -overall
- After the command line is complete, restart your computer and check if you can install the concerned driver.
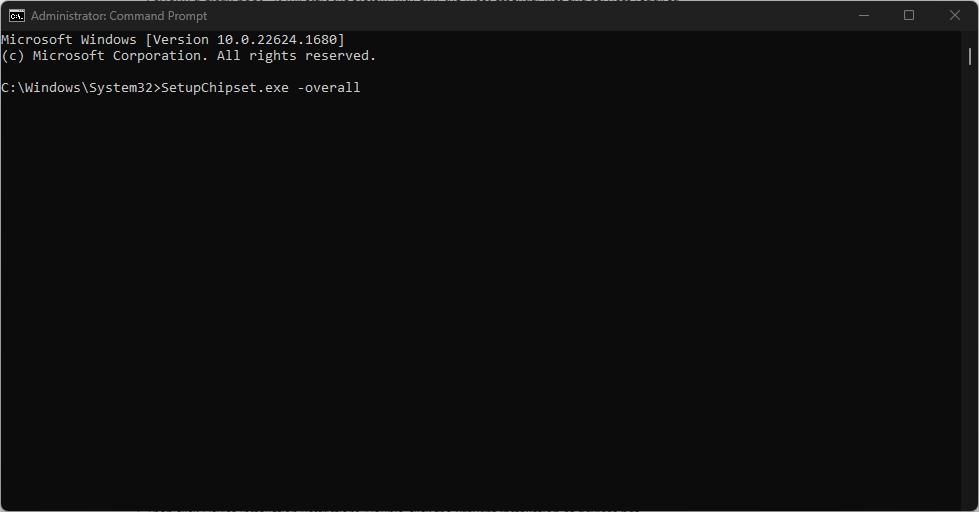
SetupChipset.exe is part of Intel(R) Chipset INF, and running its command helps configure a Software Package to deploy tricky drivers.
2. Disable Device Installation Restrictions
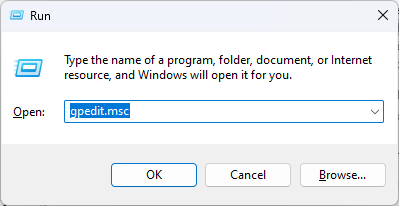
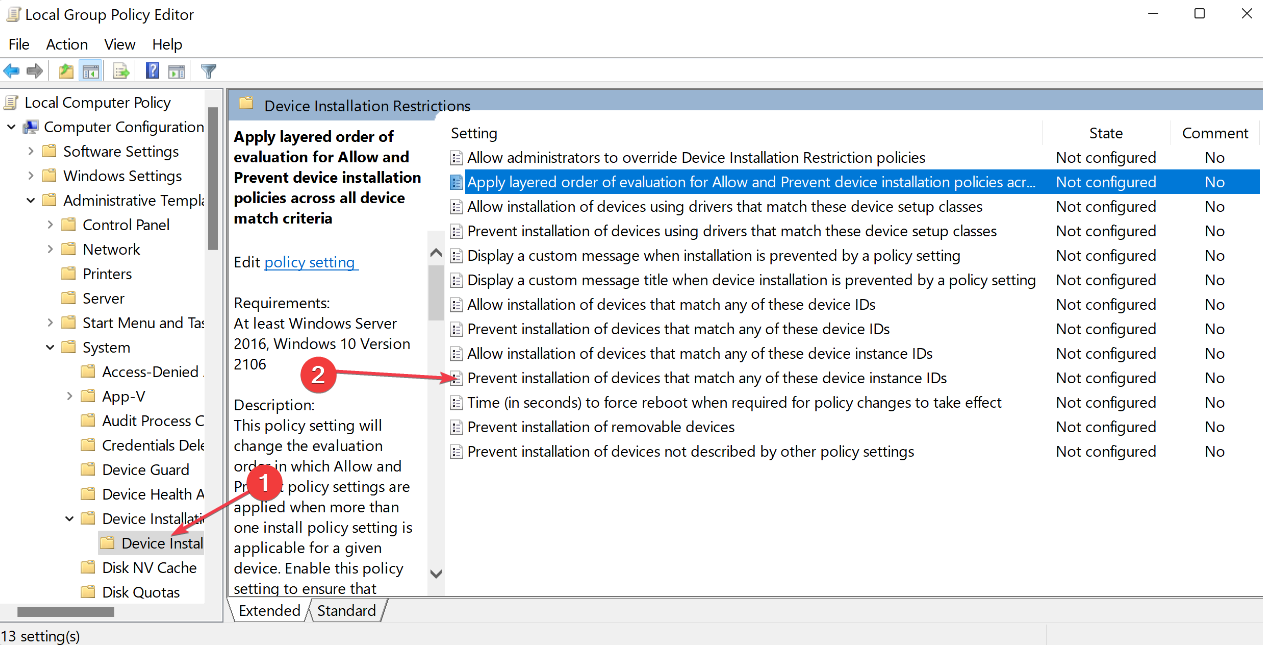
- Press the Windows + R key to open the Run dialog box, type gpedit.msc, and press Enter to open Group Policy Editor.

- Navigate to the following path:
Computer Configuration\Administrative Templates\System\Device Installation - Then click Device Installation Restrictions. Double-click the Prevent installation of devices not described by other policy settings option on the right pane.

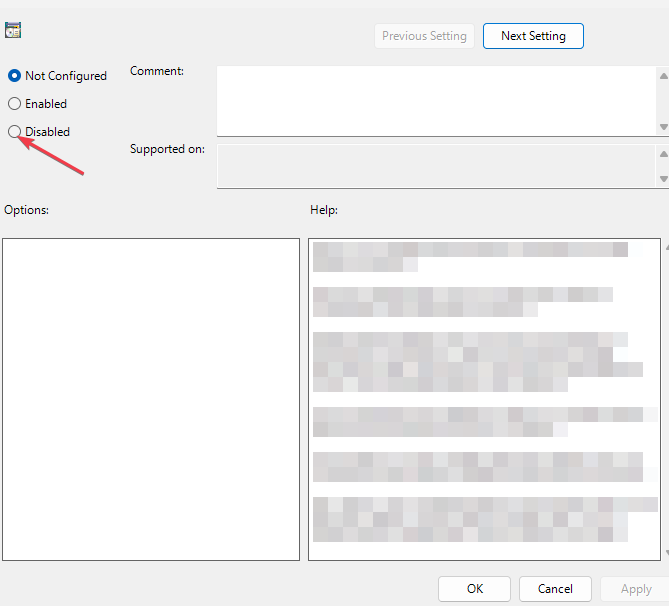
- Click to select Disabled, and then click OK to save the changes.

- Restart the computer and try the driver installation to see if the error persists.
Disabling the Device Installation Restrictions option in the Group Policy Editor allows the system to install devices and drivers not described by other policy settings.
Check our guide about how to fix the Group Policy error on Windows PCs if you encounter any problems.
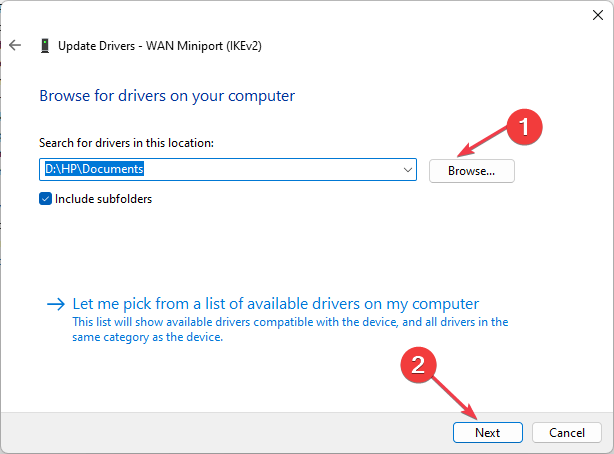
3. Manually install the driver
- Go to the Intel Download Center or your computer manufacturer’s driver site and download the latest version of the driver.
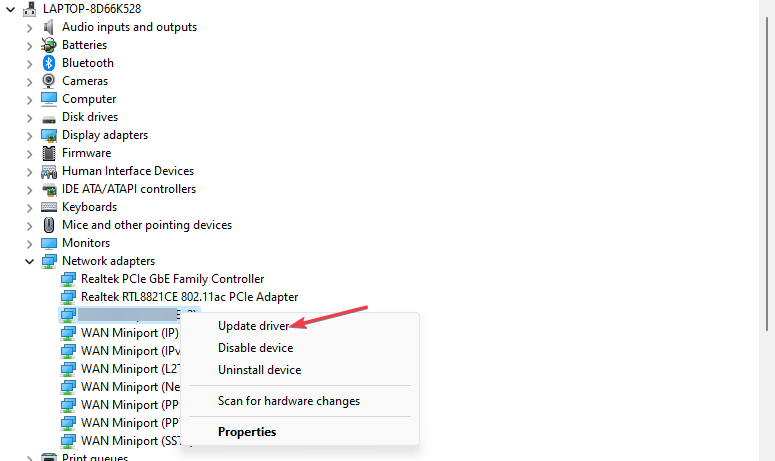
- Left-click the Start button, type Device Manager, and press Enter to open it.
- Expand the Device entry for the driver, right-click on the driver, and select Update driver from the drop-down.

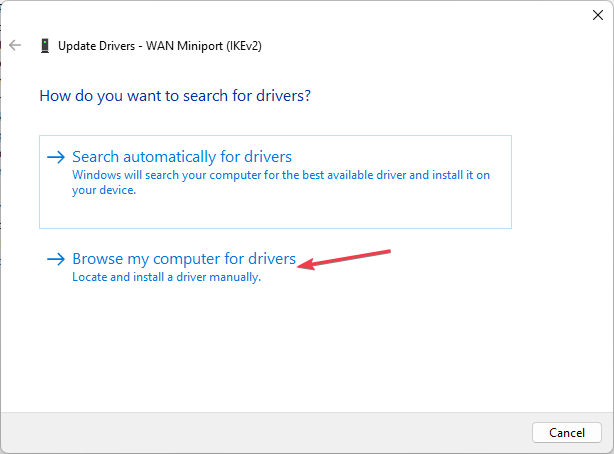
- Click on Browse my computer for drivers from the options on the new window.

- SSelect Browser to navigate to the location of the download driver file.
- Click the Install this driver software anyway option and follow the on-screen instructions to complete the installation.
The manual installation allows you to override any settings impeding the installer.
Alternatively, you can read our article about manually installing drivers on Windows 11. Also, we have a comprehensive guide on how to disable Driver Signature Enforcement on Windows PCs.
- Download and install DriverFix.
- Launch the app.
- Wait for the software to detect all your faulty drivers.
- You will now be presented with a list of all the drivers that have issues, and you just need to select the ones you’d liked fixed.
- Wait for DriverFix to download and install the newest drivers.
- Restart your PC for the changes to take effect.

DriverFix
Keep your Windows safe from any type of errors caused by corrupted drivers, by installing and using DriverFix today!If you have more questions or suggestions on this article, kindly drop them in the comments section.